


The other day I shared with you how excited I was to get alot of new sewing patterns cheap, cheap, cheap. They are so expensive and being able to use them often is the key to getting your money's worth. Plus, the pattern pieces are printed on a somewhat delicate tissue paper, which causes the paper to tear easily. It then dawned on me that I have a couple of methods I use to preserve my patterns enabling me to use them many times without them being torn to shreds.
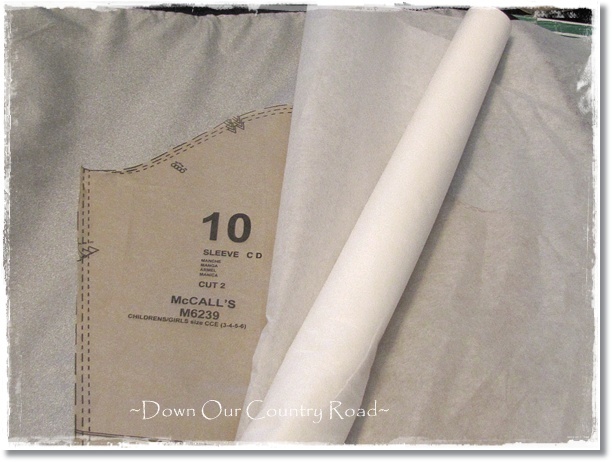
 Before trying either one, make sure that you iron each patterns to get out all the wrinkles. The first method, one that I found a couple of years ago on someone's blog, is to trace your patterns onto a more durable paper before cutting into them. The blogger recommended using freezer paper but I found it to be a bit stiff and hard to work with. So I did some research and found a product called Swedish Tracing Paper. It's pliable, strong and easy to see through. It is often used for putting together a "trial" outfit for fitting purposes. I purchased a couple of rolls and found it to be an extremely good product.
 Whether laying out several pieces at a time or one at a time, lay your paper on top and use some type of weights to hold the pieces in place. Since this is paper, you can lay them any which way to keep from wasting any and I use pattern weights. Trace all the pattern information on each piece. This method is great for when you have several sizes on each piece like this one. I find my self using this method when it is the only pattern I have because it is very time consuming. I love to use this paper when creating or tracing designs for other craft projects.


Obviously, it would be very hard to fold the patterns and put them back in the original envelope. I like to use either a Ziploc bag with the pattern envelope showing on the front OR use a manila envelope and then label it. Easy peasy.
Note: If your pattern piece is smaller than the iron plate, place a larger sheet of paper on top of it before ironing and then cut on the cutting line.
I hope this little tutorial has been helpful to you. Do you use a similar method or is this idea totally new to you? I'd love to know.
I pray you have a great day ~


The second method is the one I really like. It uses lightweight fusible interfacing. Since starting my Etsy store and sewing for my grandchildren, I need patterns in all the available sizes. I'd rather spend a couple of extra dollars (when patterns are on sale!) and use this method. A whole lot easier and faster and well worth the expense. You'll see.

Cut a piece of interfacing just slightly larger than the pattern you are working with. Lay the adhesive side up. If you are not familiar with fusible interfacing, it's the side that feels just a bit rough. Place your pattern on top. You will also need an iron on a medium setting. Start ironing in the middle working your way outward. This is very important: Make sure your iron does not go past the pattern onto the interfacing or you will get the plate all gunked up!!

After ironing the center area, cut or tear strips of paper (I use scrap copy paper) cover the edges of exposed interfacing. Finish ironing your pattern. The strips of paper will pick up the adhesive but that's okay. Once that piece is completed, just cut along the cutting lines and the strips of paper will drop away. No gunked up iron!!

Voila! You have perfectly preserved pattern pieces with all the markings, which are also visible on the back side for those times you need to flip the pattern over. Either method creates a thicker, sturdier pattern that can be used time and time again. I wouldn't recommend using pins but rather some type of pattern weight.
Obviously, it would be very hard to fold the patterns and put them back in the original envelope. I like to use either a Ziploc bag with the pattern envelope showing on the front OR use a manila envelope and then label it. Easy peasy.
Note: If your pattern piece is smaller than the iron plate, place a larger sheet of paper on top of it before ironing and then cut on the cutting line.
I hope this little tutorial has been helpful to you. Do you use a similar method or is this idea totally new to you? I'd love to know.
I pray you have a great day ~
7 comments:
Velma this is absolutely genius. I cannot believe I didn't think of this before. What a wonderful idea. Thank you so very much for sharing. All my vintage patterns that could tear to shreds could be saved forever! Smiles...Renee
That is a really great idea! I like them all. Thanks. Hugs, Cindy
Thank you, Velma! I'm just getting back into sewing after YEARS and back in the day we always used pins and it did really mess up a pattern by the time you were done. You're a whiz! I need some of those weights too! This post was a wealth of information for me. Thanks again!
Great idea! I'll keep it in mind if I ever stretch myself into sewing something that uses a pattern! :)
What wonderful suggestions. I love the interfacing idea. I tend to use the same few patterns and treat them with kid gloves so this will really be a big help.
Thanks for the suggestions lady !
I had never thought of using interfacing for that. What a great idea!
Post a Comment