Monday, December 10, 2012

~Twinkle, Twinkle, Little Star~

 In between trying to decorate the house for Christmas and trying to get a little shopping done (and I mean a little!), I've been making some new ornaments for our tree.  I came up with this muslin star that I absolutely love and thought I'd share a little tutorial with you.  In case, you wanted to make some yourself.

 Supplies I used:
fusible fleece...I love this stuff!
pre-washed muslin fabric.... give it a tea stain if you'd like.
scrap quilt batting or some type of polyfil ...this is to make your little stars plump.
rubber stamp ...this stamp is about 4 x 5" in size.
star template ...I found a paper mache one to use as a pattern, which is 4.5".  I'm not good at making perfect stars.
ink stamping pad ...the color I used is walnut.
dark red seam binding ...if the color isn't exactly the shade you want, give it a wash with watered down acrylic craft paint, scrunch and let dry overnight.
Twine....to create a hanging loop
Thread and needle...any ol' sewing thread (I used matching) and a small quilting needle works best for maneuvering.

1 ~ Using your template, cut two fabric and two fleece pieces for each star but cut the latter on the inside of your drawing line (about 1/8 to 1/4 inch).  **The fleece helps to keep the star smooth when you start adding filler.
2 ~ Center the fleece star on your fabric star and iron to adhere.
3 ~ Stamp your design onto the fabric.  I'm a novice when it comes to rubber stamping but I think I read somewhere that ironing the ink onto the fabric prevents it from bleeding.  **Cover your fabric with a piece of paper before ironing so that the ink doesn't transfer to the iron.  For those of you who have more experience in this area...am I right or no?
4 ~ If you want your stars to be a bit more rustic, run your finger or the edge of your scissors back and forth across the cut edge to fray the fabric.

1 ~ Cut a length of twine for looping and secure it on the inside of one tip of your star with several stitches making sure to pull the thread snugly.
2 ~ Put your second star piece on top and start sewing the two pieces together with a basting stitch around the edge.  Now this is the tricky part..  You are going to sew and stuff as you go...
3 ~  As you go around each point, stuff it with some filler.  I have lots of scrap pieces of quilt batting and have found that it works best for small pieces like this as it's not near as messy as polyfil.  **To make your stuffing process easier, cut batting into small pieces and use a small tool, such as a crochet hook or the point on a small pair of scissors, to stuff. 
4 ~ Work your way around the star, sewing and stuffing,.  Secure your basting with a couple of stitches in between the fabric layers to hide the knot.

Create a bow with your seam binding with as many loops as you would like. I used four. With thread and needle, run a stitch through the layers and then wrap around a couple of times to secure your bow and then stitch it to your star.
 
 I thought my little stars looked a a bit "blah" and decided to add some jingle bells.  I saw some at HL in colors of green, red and gold (not too shiny) that I loved.  They were so cute!!   But I couldn't find any small enough.  So what is one to do?  You find some regular ones in the size that works (about 1/2 inch) and paint them!  It really was a royal pain and they turned out okay, but if I find any that are the size I am wanting, these babies are going to be replaced.

Secure a jingle bell, or two, and you're done!  Now to hang them on the tree.


 I love how these turned out.  I think they fit in perfectly with all the other ornaments that are handmade or rustic in style.  I plan to make some more using green seam binding.  I hope you enjoyed my little tutorial.  If I didn't explain it well enough, don't hesitate to ask.

I've got a couple of more ornament ideas that I'm planning to share this week, so stay tuned!
.


Photobucket

Friday, November 30, 2012

~Look What Came in the Mail~

Hi there!  I don't know about you, but it took me several days to recoup from all the acitivities leading up to and into the Thanksgiving holiday. I had alot of other things going on besides getting ready for our family get-together and it truly was a blessing to have most of my family here   We had a wonderful time.  I could've done without all the other distractions as I was wiped out once the weekend came.  And then I hit the floor running again this week...doctor's appointment in the big city that takes about half my day.  And then I had to go to the hair salon twice.  Yes, twice!!  I wanted to add some more blondish highlights (to camouflage all my gray) and it came out really, REALLY blonde.  Couldn't even tell they were highlights. :/  So, I had to go back yesterday for another two-hour session to tone down the blonde and bring back some of the dark brown.  I ended up with some color streaks that weren't supposed to happen...like cherry coke type coloring!  I don't do cherry coke!!  lol  I can't decide whether or not I like it but I'll live with it for a while.  I'll have to show you a before and after picture to see what you think.  On top of that, I haven't even started Christmas shopping and am only about halfway done with the decorating.  I want my merry-go-round to slow down a bit.

Anyways, that's not what this post is about, is it?  A few weeks ago, Heather from Post Road Vintage, had a very generous giveway...$100 to spend in her online store!!  Generous, right?  Well, of course, I threw my name in the hat and guess what?  I won!!  My choices came in the mail over the weekend.  Wanna see what I picked?

 These are the items that I chose.  Quite a loot, huh?.

 This lovely handmade coat rack made with a very wide piece of decorative wood molding. I've got it leaning against my old singer sewing machine so you can see that it's quite large.  Look at those hooks!  I love the detailing.  Yes, those are fish.

Those little thingamabobs sitting on top of the coat rack are soap dispenser lids that Heather creates using reproduction zinc style mason jar lids.  I chose a couple of the soap foaming designs. She also sells the lids with the blue mason jars but I've already got some and wanted to use them.

 Recently, Heather started making her own soaps....Lavender Milk.  She had this little bar wrapped in old paper and tied with twine.  Goodness, the fragrance that came off the soap was absolutely lovely.  I've never used handmade soaps (though I've been wanting to try them) so I'm anxious to give it a whirl.

Publication preview
 On top of having a blog and creating items for her online store, Heather publishes a lovely magazine (available as an e-zine or in hard copy) called Homebound.  It is filled with farmhouse living decorating, crafting ideas and tips from herself as well as other bloggers who contribute to make this possible.  And the photography is really gorgeous  She was gracious enough to include a copy of the magazine and, I must say, it is very nice.  I love it! 

I received some really nice items, didn't I?  How this girl can do all this absolutely amazes me.  She has five children (the newest being born just a few months ago), lives on a farm with a few animals and strives to live the country way of life.  If you are not familiar with her blog, Post Road Vintage, I encourage you to pay her a visit.  Don't forget to check out her online store and magazine.  You'll be glad you did.

Well, the weekend is here and I've got to finish decorating the house and making the handmade ornaments that I've been working on inbetween all the busyness that's been happening around here lately.  I look forward to showing you those next week.

Have a lovely weekend~
Photobucket
Pin It


Wednesday, November 21, 2012

~Happy Thanksgiving!~

~Be joyful always; pray continually; give thanks in all circumstances, for this is God's will for you in Christ Jesus ~ I Thessalonians 5:16-18
 
"In Thanksgiving, Let Us Praise Him"
From the first bright light of morning to the last warm glow of dusk;
Every breath we take is sacred, For it is God's gift to us.
 
In the season of our plenty, in the season of our need;
We will find His grace sufficient, we will find His love complete.
 
Safe within His hand that guides us, Hidden in His healing wings;
Day by day His love provides us every good and perfect thing.
 
In thanksgiving, let us praise Him; In thanksgiving, let us sing
Songs of praise and adoration to our gracious Lord and King.
~Austrian hymn~


Photobucket
Pin It

Saturday, November 17, 2012

~Strawberry French Toast and A Cookbook Winner~

I'm sharing another one of my cookbook recipes with you today.  I started making Strawberry French Toast for our B&B guests after it became an instant hit with my family.   It's one of those dishes that you prepare the night before and then all you have to do is stick it in the oven in the morning!  Those types of dishes work really well for me as I'm not really a morning person.  What?  Yeah, hard to believe, huh?  A non-morning person getting up at the crack of dawn to prepare a gourmet breakfast for B&B guests.  It was definitely God working in me to be able to do that and, I must say, it brought me great joy.

 This is one easy-peasy recipe but it is so yummy!  It's pretty self-explanatory so I won't bore you with more details.  Though I haven't tried it, I'm sure any type of berry could be used.  And the recipe could easily be cut in half if necessary....but who would want to? lol

And I have a really scientific method for choosing the winner of my Breakfast & Brunch Cookbook.  You'll be impressed ;)  I haven't figured out how to number my comments (someone help me?) and I don't have that random generator thingy downloaded either, so I just had my hubby, Mr. Bill, choose a number and I had him verify his choice...

Impressive, huh?  Thank goodness there weren't a hundred jillion comments and I only had to count down to #11.  I found that it belongs to Kerin, one of my dear blogging friends, from Always Fixin', Never Sittin'.  Kerin said..."I'd have to say, I'm both a baker and a cook.  I love to do both, and do both on a regular basis.  Nothing like a home cooked meal!"
Congratulations, Kerin!  I'll send you an email so that I can get your mailing address.
Thank you for all of those who entered.  If, by chance, you would like to purchase one of my cookbooks, you can do so at the My Store page on this blog.
 

 It's a beautiful day today.  I pray that you are able to find a little beauty in your day as well~


Photobucket
Pin It


Wednesday, November 14, 2012

~DIY Detergent Recipes~

Have you started making your own soap detergents and cleaners yet?  My youngest started on the bandwagon about a year or so ago searching for safer ways to keep her family and home clean.  She is the one who brought to my attention how UNsafe many of the ingredients are in products that I have used for years.  So, I've been changing the way that I clean.
 
 Laundry Detergent.  There are lots of recipes out there, for both dry and liquid concoctions, with slight variations here and there.  So you may want to do a bit of Google searching to see which one would work for you.  This is the recipe that I found some time back and have been using it for several months now.  Ingredients needed:
4 lb. 12 oz. box of Borax
4 lb. box of Baking Soda
3 lb. 7 oz. box of Super Washing Soda
4 bars of Ivory soap (or any natural soap such as Fels Naptha, Castile or Zote), grated
3 lb. container of OxyClean**

**Our clothes weren't quite as bright as I would have liked, so I ended up adding OxyClean.  An ingredient seen in many of the soap recipes I've found.  Much better!!

Note:  I have a front-loading washing machine and this is perfectly safe to use.  I use about 2 to 3 Tbsp. (little less than 1/4 cup) per load.  I haven't found anything that says to use more for top-loading machines.

I had a couple of bars of the Castile soap and decided to use it along with the Ivory.  Some soaps are easy to grate and some are not.  Ivory is a softer bar and grated very easily while the Castile bar is harder and took a little bit more effort to grate.  I found that using a regular ol' cheese grater was actually faster and easier than using my mini food processor.  Could have been my machine, I don't know.

Fabric Softener.  We use well water out here in the country and it is a very hard water with lots of mineral content.  To a large bottle of regular ol' vinegar, I add at least 30 to 40 drops of lavender oil (for fragrance).  Add about one-half cup to the rinse section of your washing machine.
You could use any essential oil but I use the lavender because of its calming effect.  This particular oil is not overpowering and I could probably add more oil if I wanted a stronger fragrance.  I just order mine on Amazon.  The vinegar is not only great at softening our clothes but to clean the gunk out of the washing machine!  I need to do a post about all the different uses for vinegar.

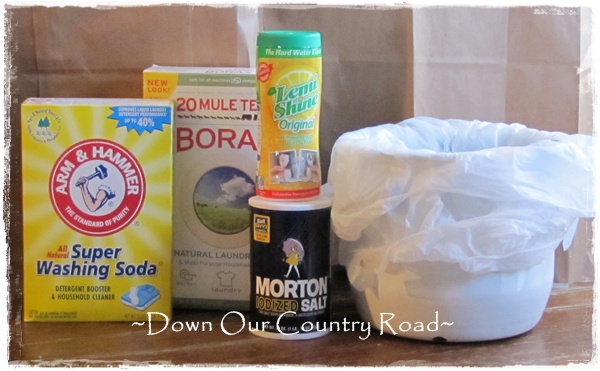
 Dishwasher Detergent.  I've finally used up my stash of over-the-counter dishwasher pods and am able to use this recipe that I found on Pinterest; first posted on  Liz Marie's blog.  Needed ingredients:
4 lb. 12 oz. box of Borax
3 lb. 7 oz. box of Super Washing Soda
Large container of Lemi-Shine (citric acid or Fruit Fresh has also been recommended)
1 cup of regular or Kosher Salt (works as a softening agent)

 Pour all your ingredients into a large trash bag.  Close the top of the bag with one hand and use your other to, basically, knead the ingredients together mixing and breaking down any clumps.  This also helps keep 'dust' particles from floating around in the air that you don't want to be breathing.  You don't want to be digging your hands into the mixture as it can be a little hard on the skin.

 Hold the bag over the large container that you'll be using for storage and cut a slit close to the bottom of the bag.  Much easier than trying to pour it from the top! ;)

 I am using one of my cherished enamel pots to store my soap, which is about 8 inches tall so you can see that it makes quite a large amount.

 Now all I need to do is create a cute little label to put on the front!
 
 My dishes went from this (can you see the cloudiness on the glass?)....
 
 ...to this!  Look at that shine!!

I didn't figure up the cost of what I spent on ingredients for my soap recipes but I can guarantee you that it's a whole lot cheaper than the name brands...and much safer to use, too.  Plus, a little goes a long ways!  I'm a believer.

How about you?  If you've jumped on the bandwagon, I'd love to know about your recipes.  If not, I encourage you to at least make a small batch to see what you think.

Oh, don't forget!  The giveaway for my Breakfast and Brunch Cookbook ends tomorrow, November 15th.  If you haven't entered yet, you've still got time.  Go here to get your name in the drawing.

Have a sparkling, sunshine-y day today!!
Blessings~

Photobucket
Pin It


Thursday, November 8, 2012

~A Breakfast and Brunch Cookbook~

In my post earlier this week, I shared with a recipe from this Breakfast and Brunch Cookbook that I created for guests who stayed in our home when we had a Bed and Breakfast.

I am having a giveaway for one of my cookbooks (more about that in a bit) but I still have several left from my Bed and Breakfast days and am offering them up for sale.  But, first, I want to show you some of the features and photos of some of the recipes.  Please note that there are NO pictures included in this cookbook!! Years ago, when saving recipes from various magazines I would also clip the photos.  I have no idea where those recipes came from so I can't give credit where it is due.  Most of the recipes are from my personal collection with many being family favorites and others are from various family members who helped make this cookbook possible.

So, let's take a look shall we?


 Six categories with about 245 different recipes...quick and easy to yummy and gooey. 

Banana Brunch Punch.  I served this beverage concoction at a shower several years ago and it was a big hit.  It serves 16 to 20 but can be frozen in smaller batches.

Blueberry Sour Cream Pancakes.  I have served this dish MANY times for either breakfast or supper.  So, so good!!

Sausage Brunch Casserole.  I shared this recipe with you the other day.  Another one of our family favorites.  All it needs is some fruit and maybe a quick bread...there are many to choose from in my cookbook! ;)

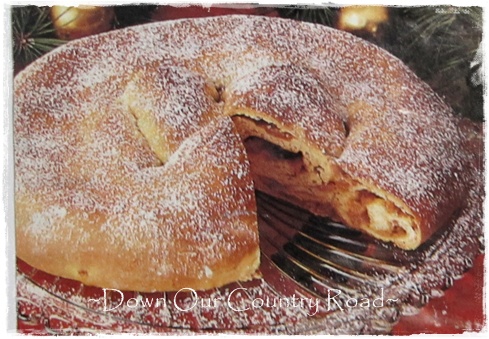
Russian Krendl.  Many years ago, this yeast bread became a family tradition on Christmas morning.  I would prepare the bread the night before, store in the fridge and then pop it in the oven to bake while all the presents were being opened!  A bit of extra work but SO well worth it.  My husband is half Russian, which made this dish all the more special.

There you go!  A peek at some of the many recipes (minus photos).  Just in time for the holidays and for gift giving.  The cost is only $10.00.  Shipping is included in the price for U.S. citizens only.  UPDATE If you would like to purchase one, please let me know and I will send you a PayPal invoice.  I have just added the cookbook to the My Store page where you can just click and make your purchase through PayPal.  If you have any problems, please let me know so that I can get it corrected.

Don't forget.  I'm giving one of these cookbooks away.  If you would like a chance to win one, enter the giveaway here...it ends on November 15th!!


Thank you so much.

Happy cooking and baking~


Photobucket
Pin It

Sharing at these blog parties:
Etsy Cottage Style
Sunny Simple Sunday


LinkWithin

Related Posts Plugin for WordPress, Blogger...