 |
| Shared from a friend's FB page |


Sunday, October 16, 2011
~Sunday Scripture~


Friday, October 14, 2011
~My Mother's Cornbread~
Yesterday I shared with you a recipe for Creamy Chicken and Noodles. Homemade cornbread was a must to serve with this dish and I promised to share with you my recipe entitled My Mother's Cornbread. This isn't my mother's recipe. All of her cornbread came from a box. Jiffy Cornbread Mix.
 Years ago, many years ago, Mr. Bill and I lived in Freeport, Illinois. I don't remember how I came across this cookbook but I wanted to buy it as it was one that was put together by the ladies in Freeport. Many of them were recipes that had been passed down thru generations. There had to be alot of good recipes in there. I must think so. Several of my favorite recipes come from this book. As you can see, this cookbook is well worn. It was not only one of the very first in my collection but it became my Bible of cookbooks. My first child was very small at the time. It was 1976.
 The cover is gone and even a few of the pages have come out. I have tried to save them. I guess I need to put them in some kind of binder before losing them. Having never made homemade cornbread before, I tried several different recipes. You can see some of the notations I made in the first photo. I try to do that when trying a new recipe. Make a notation of what I thought about the recipe and whether or not it was worth keeping. After trying several, this one became my favorite. It is the only recipe I use for making cornbread and it has never failed me in all the years that I have placed it on the dinner table. Thank you, Lucy...whoever you are...for sharing this recipe.
 List of ingredients:


- 1-1/4 cups of flour
- 3/4 cup of cornmeal (I like the coarse ground to give a better texture)
- 1/4 cup of sugar
- 1 Tbsp. baking powder
- 1 tsp. salt
- 1 cup of milk
- 1 beaten egg
- 3 Tbsp. melted butter
The combination of flour and cornmeal gives a softer texture. The addition of sugar gives it a bit of a sweet taste. Sift together all dry ingredients in a medium bowl. Pour in milk and beaten egg mixing until well blended. Stir in melted butter.

Pour into a greased 8- or 9-inch pan. Bake at 400 degrees for about 30 minutes until nicely browned. The cracks in the top shows that it is nice and done. Let it set for about 10 minutes before cutting. Doing so allows the cornbread to bond together and not being so crumbly when you cut pieces. Did you know that?

Look at all that goodness! Can you see the softer texture in the cornbread? In that, I mean that it's not too coarse, which can happen if you use only cornmeal. If you prefer the coarse texture, you can still use this recipe by using all cornmeal and no flour. I have done that but prefer the softness the flour gives.
Cut yourself a piece while it's still warm and slather on some butter. Watch it melt and dig in! I always find myself having at least two pieces. Did you notice? I said "at least" two pieces. That could mean two and maybe even more. But I'm not telling. I don't want you to know how much of a pig I can be! :)
This cornbread is so good with soups of any type or chili and even pot roasts. I promise that you'll really, REALLY like it. Having served it for all these years is testimony to how much my family enjoys it. I hope you and your family enjoy it as much as we do. Click My Mother's Cornbread for the recipe.
Quote for the day ~ "Autumn is a season followed immediately by looking forward to Spring." ~
Anonymous
Thursday, October 13, 2011
~Creamy Chicken and Noodles~
Finally, it's starting to feel a bit like Fall around here and I always look forward to making "warm your tummy" type meals that are expected this time of the year.
Over the weekend, we had much needed rain and it just felt like Fall. Trying to come up with something for dinner is becoming much more of a challenge for me these day. I spotted my Gooseberry Patch Slow Cooker Recipes cookbook and started thumbing thru its pages. I came across the Creamy Chicken and Noodles recipe, which is usually a mainstay meal that I make often, but this one was a bit different. It had butter in it. Hmmm...sounded interesting so I thought I'd give it a try.
 I kinda revised the recipe in that this one didn't have any veggies in it. You can't have chicken soup without vegetables...it's sacrireligious!! At least with my homemade variety, it is. How about you?
I cut the recipe in half since it's just Mr. Bill and I these days. Even halved recipes are sometimes too much, but that's the joy of soup. You can freeze it and enjoy some later. At least that's what I have to do for Mr. Bill as he doesn't like to have "day after" leftovers. When he was a kid, an only kid at that, his mom would fix soup that would last for days and days. He was scarred for life because of it.
 Cutting the recipe in half calls for one to two chicken breasts, 1/4 cup of butter, one can of Cream of Chicken soup and two cans of chicken broth. Tip: In a separate bowl, combine the soup and broth stirring with a whisk to get all the lumps out before pouring it over your chicken. I love, LOVE Reames frozen egg noodles! I used to make my own egg noodles alot way back when; as in when my children were young and still under my roof.
 I added the veggies...the norm for my chicken soup. Chunked carrots and celery, and chopped onion. Whatever floats your boat on how much you want to add. Surprisingly, there were no spices in the soup recipe. In my version, I added about 1/4 tsp each of sage, marjoram, thyme and about a tablespoon of parsley; all dried spices. Or you could use poultry seasoning, which I use as well. Depends on how I'm feeling that day. :)
 I LOVE my Hamilton Beach three-in-one slow cooker and had to show it to you. I got it as a gift this last Christmas. It has three different sizes of crock bowls; two, four and six quarts. I love the versatility of having the different sizes to suit the occasion.
For Mr. Bill and I, usually the four-quart bowl is sufficient. IF I had the two-quart bowl, it would be great for dips, sauces, or for one-person meals. But I don't have the two-quart bowl!! When the slow cooker came, the smallest bowl was broken. I requested a replacement that took several attempts and about six weeks later before the replacement came. It, too, was broke. Arrgghhh! I contacted the company and asked for another replacement. It, AGAIN, took several weeks but I never received the bowl even though they said they sent it each time I called them, as a matter of fact, and finally gave up. Sigh....one of these days, I 'll order me one without contacting the company. Anyway, I do love my slow cooker.
 Because my chicken was still frozen, which happens with my meats most of the time, I cooked the soup on high (without the veggies) for about 3 hours, added the veggies and cooked them another hour before adding the frozen noodles.
 I don't think I added enough broth or I added too many noodles. I never measure my noodles so either there's too many or not enough. Thankfully, noodle products aren't that expensive. But doesn't it look yummy?
 I also made some homemade cornbread. The recipe is called My Mother's Cornbread, which is funny because it isn't really my mother's recipe and she didn't really make homemade cornbread. Hehehe. I'll share the recipe and the story behind the cookbook tomorrow. In the meantime, it's time for dinner!!
This type of homemade soup is so easy to make and generally doesn't need a recipe, but I'm making a printable recipe of MY version of the soup just in case you want to add one to your library of great meals. Click for the Creamy Chicken and Noodles recipe.
P.S. The butter does give the soup a distinct flavor. I think that I prefer the soup without the butter but try it for yourself to see what you think.

Quote for the day ~ "The leaves fall, the wind blows, and the farm country slowly changes from the summer cottons into its winter wools." ~ Henry Beston, Northern Farm
Over the weekend, we had much needed rain and it just felt like Fall. Trying to come up with something for dinner is becoming much more of a challenge for me these day. I spotted my Gooseberry Patch Slow Cooker Recipes cookbook and started thumbing thru its pages. I came across the Creamy Chicken and Noodles recipe, which is usually a mainstay meal that I make often, but this one was a bit different. It had butter in it. Hmmm...sounded interesting so I thought I'd give it a try.

I cut the recipe in half since it's just Mr. Bill and I these days. Even halved recipes are sometimes too much, but that's the joy of soup. You can freeze it and enjoy some later. At least that's what I have to do for Mr. Bill as he doesn't like to have "day after" leftovers. When he was a kid, an only kid at that, his mom would fix soup that would last for days and days. He was scarred for life because of it.


For Mr. Bill and I, usually the four-quart bowl is sufficient. IF I had the two-quart bowl, it would be great for dips, sauces, or for one-person meals. But I don't have the two-quart bowl!! When the slow cooker came, the smallest bowl was broken. I requested a replacement that took several attempts and about six weeks later before the replacement came. It, too, was broke. Arrgghhh! I contacted the company and asked for another replacement. It, AGAIN, took several weeks but I never received the bowl even though they said they sent it each time I called them, as a matter of fact, and finally gave up. Sigh....one of these days, I 'll order me one without contacting the company. Anyway, I do love my slow cooker.


This type of homemade soup is so easy to make and generally doesn't need a recipe, but I'm making a printable recipe of MY version of the soup just in case you want to add one to your library of great meals. Click for the Creamy Chicken and Noodles recipe.
P.S. The butter does give the soup a distinct flavor. I think that I prefer the soup without the butter but try it for yourself to see what you think.
Quote for the day ~ "The leaves fall, the wind blows, and the farm country slowly changes from the summer cottons into its winter wools." ~ Henry Beston, Northern Farm
Saturday, October 8, 2011
~Tailgating Snack~
We live about half an hour from Stillwater, home of the Oklahoma State Cowboys, and the school where Mr. Bill played several years of football back in his day. We are die hard fans for our Pokes!! It was very hectic around here getting our RV ready for a weekend of tailgating so I wasn't able to get this post ready before game time. I wanted to share with you a great snack that I made for our weekend event. But since it's a great snack for watching a movie; while warming up by a crackling fire; tailgating; parties; and even gift giving, I thought I'd go ahead and share this.
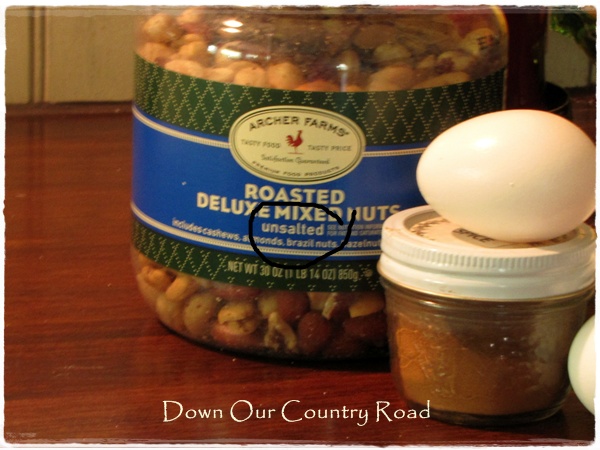
 Awhile back, I bought a jar of mixed nuts (Mr. Bill likes to have them for snacking) when shopping at Target. I've been buying them for a long time and never realized that they also have an "unsalted" variety. And, obviously, I'm blind about reading labels...it's there in bold print. See? UNsalted. Anyway, unsalted, roasted nuts have a very bland flavor not worthy for snacking purposes. I didn't want them to go to waste and stuck them in the freezer. Then, the thought hit me..."Spiced nuts!!! I'll save them for this fall." So, that's what I did.
 Fall is here. Tailgating time is here. What better time is there to make some Spiced Mixed Nuts for snacking? I have used this recipe in the past and it was a big hit. The original recipe calls for:


- 8 oz. dry roasted peanuts
- 1/2 c. unblanched whole almonds
- 1/2 c. walnut or pecan halves
- 1 egg white, lightly beaten
- 1 tsp. water
- 3/4 c. sugar
- 1 Tbsp. pumpkin pie spice
I figured the jar contained about six cups of nuts, so I tripled the recipe. AND, I used
2-1/2 tbsp. apple pie spice mix (it's all I had) and added pumpkin pie spice to make up the difference.
Directions: In a large bowl, combine egg white(s) and water. Add nuts; toss to coat. Combine sugar and spice; sprinkle over the nuts and toss until well coated. Spread nut mixture on a lightly greased baking sheet. Bake at 300 degrees for 20 to 25 minutes. Immediately transfer to waxed paper to cool. Break up into large clusters and store in covered container.

My spiced nuts didn't turn out like I wanted because I was in a hurry. Here's where I went a bit wrong. I forgot that this recipe was pretty sweet and forgot to cut back on the amount of sugar...about half of what the recipe calls for. Because I made one large batch instead of three small batches, the sugar didn't 'cook' like it should have. I needed to run a few errands, so I turned the oven off after 30 minutes and left them there while I was gone. As a result, the spiced nuts turned out more like a praline instead of slightly sweetened, spiced nuts.
If you like the praline type nuts then, by all means, add all the sugar. They still taste good. Really good. All in all, they turned out pretty yummy. And they're addictive, too. You can print out the recipe for Spiced Mixed Nuts here.
Quote for the day ~ "For man, autumn is a time of harvest, of gathering together.
For nature, it is a time of sowing, of scattering abroad." ~
Edwin Way Teale
Wednesday, October 5, 2011
~Farmhouse Cupboard Vignette, Part Three~

Today, we finish up our little tour of my farmhouse cupboard. I hope you've enjoyed reading about all my finds so far. I get so excited if I know a little bit of the history about the things I collect. It makes for a much more interesting collection and so I thought I'd share with you a bit of history behind each of one of these items. Maybe it will inspire you to learn more about what you have on your shelves and in your cabinets or, better yet, it will inspire you to start your own antique collections.

Before we get started with my cleaning and medicine cabinet supplies, let's start with the items behind them. I love the yellow ironstone pitcher. It has no markings on it so I have no idea where it came from or how old it is. I chose it mainly because it is yellow and it goes well with my kitchen colors. The end. Now the knives inside the pitcher are worth mentioning.

Those well worn and somewhat rusty knives belonged to my grandmother. Wicked looking aren't they? I won't ever use them but I might try to take the rust off to preserve them a bit better. How do you take rust off of metal knives anyway?

The Shinebrite Polishing Cloth container is made out of a type of fiberboard. I tried to find out when this product may have first been produced but no luck. The aging plus wear and tear tells me it is somewhat old. With the design on the can, and parts of the directions telling you how to correctly polish your automobile, I'm thinking maybe 1920s to 1940s? I love it because the polishing cloth is still inside and, yes, it has been used.
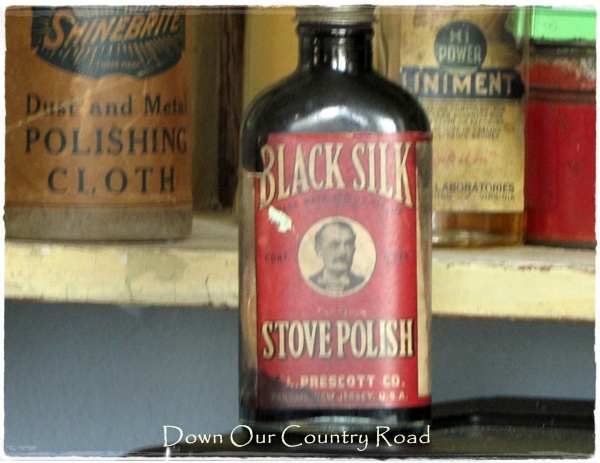
The Black Silk stove polish bottle is empty but can you imagine all the old cooking stoves it was used on? I found an advertisement dating 1906 in a hardware dealers' magazine for the canned variety and a newspaper advertisement dating 1919 for what looks like the bottle variety.

You can see there is still a tad amount of the powerful potion in the Blair's Hi-Power Liniment bottle. I don't dare open it. I'm afraid it will be so potent that it'll knock me off my chair! LOL. "A rubbing compound for muscular soreness due to exertion or exposure. Aids nature in healing cuts, sprains and bruises." Again, I am batting zero on finding out more about when this product was manufactured and sold. :/ One of these days I need to get a catalog or book about vintage cleaning products and medicines so that I can learn more.

Somebody ate all the mints in the Peerless Maid peppermint tin. The company, Peerless Confection Company, was started in 1914 and then closed its doors in 2007. The trademark for "Peermints" was obtained in 1963. With the "wear and tear" of the candy tin, one would think that it is rather old but it isn't. Still, I like the way it looks.

The Bag Balm antiseptic cream still has some cream in it and it don't smell so great. You can still find this product today. "For minor congestion of the udder due to calving, high feeding, bruising or chilling." In other words, it is used to keep a cow's teats from getting dry and chapped. Yep, you read right. Alot of men, who work outside in the elements or have seriously chapped hands, use bag balm. Including my two sons-in-law and Mr. Bill.

The white jar without the label says Musterole Cleveland on the top of it. The mustard ointment was sold starting in 1905 as a convenient substitute for mustard plaster and used in the same manner to relieve chest congestion, coughs, minor throat irritation and muscle aches.

I have most of my cookbooks housed on the rest of the shelf. I hope to buy some more collectibles to fill this space and will move the cookbooks elsewhere. Two of the cookbooks are from the early years of my marriage and one belonged to my mother. The only cookbook she ever owned and used mainly for the holidays. Maybe that's why I collect so many cookbooks. Anyhow, I'll share those at another time. :)

I have had this cupboard hanging in my kitchen for over four years adding a few collectibles here and there. Not until I started rearranging and taking pictures did it really dawn on me how dark and dreary those shelves were! You know, it's kinda like how you don't notice the cobwebs up in the corner of the ceiling until you have guests? Please tell me you've had that happen to you, too. Okay, maybe not.

After seeing how dark and drab my shelves were, I decided they needed a little lighting to brighten things up a bit. So I purchased a couple of 25-light strands. I know, I need to get another one for the bottom shelf. I'm going shopping tomorrow.
I've got the lights on a timer so that they shine during the evening hours. I love not only how it brightens up my cupboard vignettes but also how the soft lights make the area look so warm and inviting. So what do you think? About the vignettes and the added lighting.
"Autumn is a second spring when every leaf is a flower." ~
Tuesday, October 4, 2011
~Farmhouse Cupboard Vignette, Part Two~

 |
| "This is why they call me Monkey!" |


Tomorrow, I'll finish up our little vignette tour and also share a few changes that I made. I'm looking forward to it and hope to see you then as well.
"Everyone must take time to sit and watch the leaves turn " (E. Lawrence) ~
Wednesday, September 28, 2011
~Farmhouse Cupboard Vignette, Part One~
Several years ago after building our new home, there was a little nook in the breakfast area that needed to be filled. I had an idea of how I wanted it to look. One, I was looking for some type of antique, shabby looking cupboard to go in that space; two, it had to have the right dimensions; three, it had to be in the price range that I was willing to pay, and four, it had to be yellow or white. (My kitchen and dining room are creamy shades of blue and yellow.) Now, that wasn't too much to ask for was it?
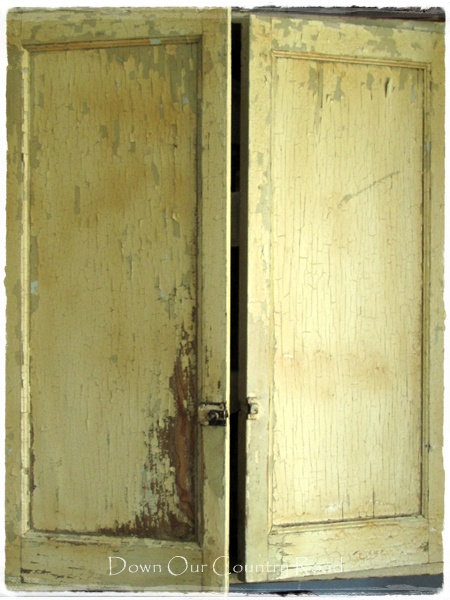 I had been searching for only a few months going to some of my favorite antique store haunts. Lo and behold, I walked in a store, had one of those "lights shining from heaven" moments. I swear I could hear the angels sing. I saw this yellow cupboard, which is actually a darker yellow than the pictures give justice, sitting on the floor! I had my handy dandy little tape measure with me ( a must for serious shopping), ...it fit the space, it was the right color and, you guessed it. it was the right price! I think those guys were kinda shocked that they had made a sale with a customer who had been in the store maybe five minutes.
 The cupboard was a perfect fit, I think. If it had been any larger, I don't think I would have been able to keep the cabinet doors open all the way, which is what I was wanting to do to show off my collection of antiques, precious family pieces and gifts. I didn't care that there was warping and alot of peeling on the doors. It added to its charm.

 Even on the inside of the doors, there is peeling of paint, stain and warping. Having my home built and decorated with all the blemishes that make up an old home was what I was going after, which gives it such character and charm. I feel very at home with this type of decorating.
 Having the doors open to show off everything made for great conversation with my bed and breakfast guests and family. I could explain that this item came from an antique shop or this one came from an auction. A couple of pieces are very special in that they were given to me by bed and breakfast guests who came back for another visit and knew what I liked to collect. Several of the pieces were items that were on my wish list of things to own someday. The pieces I most cherish are the ones from my grandmother, which I will point out later. :)
I didn't realize I had so many vignettes going on until I dusted and cleaned my normally hodge-podge look. Most of the items in my collection are things that a farm wife would have in her kitchen and I liked the idea of arranging them according to some kind of theme. With so many items to look at, I thought it best to break my 'tour' down to two maybe three posts.
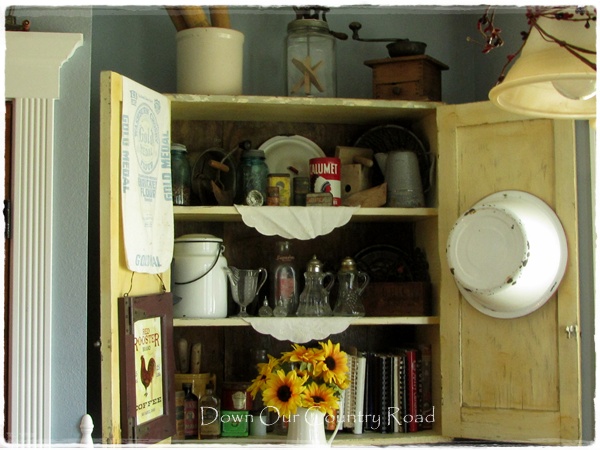
 My handy-dandy son-in-law installed the cupboard for me (I made sure he had it secured really, REALLY well since I knew I had lots of things to put in there.) I was very glad that there was plenty of space on the top to display some of the taller items. The butter churn and coffee grinder were items that were on my wish list. I had only one rolling pin in my collection originally and decided it looked rather lonely all by itself, so I got a couple of more and then needed someplace to store them. What better than an old crock?

 I love having the beautiful blue canning jars on the top shelf. It adds a little burst of color. The gadget in the back with the large handle is a fruit/vegetable masher used to puree such items for canning purposes. The item in front of the masher looks rather menacing, doesn't it? I 'think' it's a dough cutter. I knew at one time, but have forgotten. I need some help on this one. Anyone know? For a flash of pizzazz, I added this glass door knob. Mr. Bill gave it to me one year for my birthday along with some other little antique knickknacks.
 I love my little collection of metal tins. I may have picked up a piece here and there. A couple may have been gifts. I honestly don't remember (effects of the meds I'm on :/ ) Most of the brands, I've never heard of. There's Rumford Baking Powder, Royal Tudor Cocoa, Country Club Black Pepper (I don't think this one was ever opened as it is quite full!), Steero Bouillon Cubes and the well known Calumet Baking Powder. The white enamel lid in the back goes to a large pot that I am using to house a plant in a bathroom.
 Years ago, when our children were younger, we went through a period of making our own butter and I used this butter mold and paddle (again, given to me by Mr. Bill). The tinware in the back is a strainer and then the tinware coffee pot.
 I love my collection of antiques. It's almost like having my own mini antique store! I'll take you on more of a tour tomorrow. So, what do you think?
Hope you have a sunshine-filled day today ~


I didn't realize I had so many vignettes going on until I dusted and cleaned my normally hodge-podge look. Most of the items in my collection are things that a farm wife would have in her kitchen and I liked the idea of arranging them according to some kind of theme. With so many items to look at, I thought it best to break my 'tour' down to two maybe three posts.


Hope you have a sunshine-filled day today ~
Update: I am participating in a blog party at Laurie Anna's Vintage Home
Subscribe to:
Posts (Atom)
LinkWithin
