Showing posts with label crafts. Show all posts

Monday, September 23, 2013

~Crafting Lap Tray Makeover~

I do alot of hand work...sewing, crocheting, etc, while sitting in my comfy recliner as I watch TV.  Multitasking, you know ;)  But I don't know how many times that I have dropped my scissors, thread, crochet needle and such and then they slip down the side of the cushion and down into the bottom of the recliner!!  Which means I have to get up, turn the recliner over and try to dig out my lost items.  Not fun.

I thought a lap tray would work but everything would still roll or slip off the tray.  I came across some crafting trays at the fabric store but the designs they had in stock just didn't appeal to me.  Everything was for either children or teeny boppers. Bummer.  Finally, it dawned on me.  Get one and give it a makeover!!

I found this one at HL.  Truth be told, there is absolutely nothing about the design that I find appealing.  It's just not my style.  The only good thing it had going were the cup and pencil holders.  Perfect for holding those little items that slip out of my hands and fall down into the cushions!

But I had to do something about these colors...

And definitely this backing!  A velour type fabric means only one thing...it will attract threads and bits of fabric like nobody's business.  Not good.  There is a carrying handle and a zippered opening for replacing or adding more of those little styrofoam beads if one was so inclined but those aren't on my 'must-have' list.

First thing to do was repaint the cup and pen holders.  I used my craft paint but it wasn't sticking very well and scratched off very easily.  So I scraped it off and mixed the paint with some Mod Podge glue.  That seemed to do the trick.

I dug through my stash of scrapbook paper and found some that looked rather feminine.  Using the Mod Podge glue again, I adhered it to the top of the tray but it created too many bubbles so off it came.  Next attempt was with spray adhesive.  Much better.  The hard part was piecing the paper sheets together and cutting around the holders. I let it dry overnight and used an exacto knife for trimming but still did a rather sloppy job of it.  What does any smart crafter do?  You cover it up!!  Before applying the mini pompom trim, I sealed the scrapbook paper with a layer of Mod Podge as I was afraid the paper would tear easily.  I started freaking out when it started bubbling again but was able to work them out once it started drying.  Whew!
 
For the back, I purchased this quilted fabric in an ivory color.  I turned the tray upside down, laid the fabric over it and just did some freehand cutting.  I saw no need to take off the black velour.  Using my hot glue gun, I worked my way around the tray adhering the fabric along the edges leaving the rounded corners for last.  Then I just scrunched up a little bit at a time and glued some more.  It wasn't too tricky and didn't have to be perfect because of the soft bottom.
 
I used some more of the pompom trim to cover up the raw edges of the fabric.  I started at the bottom middle (area closest to me) and just overlapped it a bit so that it didn't show too much.  All of the trim was applied using the hot glue gun.
 
Don't look too closely at the sloppy job I did with the glue gun. :/ 
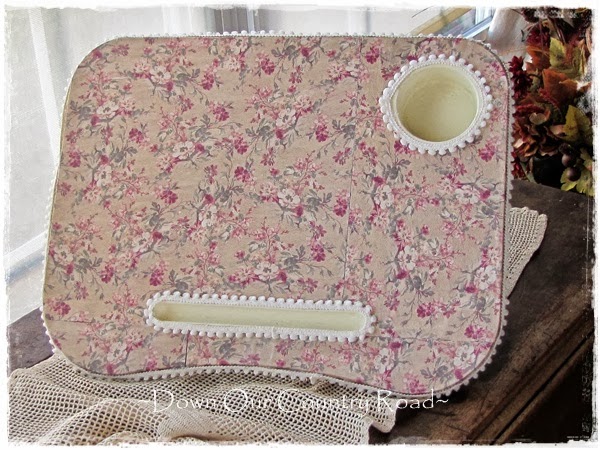
So there you have it!  My not so appealing crafting lap tray is now something pretty to use while I'm working.  Much better, don't you think?
 
Now it's time to get to work on some projects...maybe this one?
 
 
Until next time ~

Photobucket

Thursday, September 19, 2013

~Like A Bee In A Flower Garden~

Have you ever wondered what a bumblebee is thinking whenever it comes across a beautiful flower garden?

Internet source
Can you imagine what it (he..she...) is thinking with all those beautiful colors and scents?  "Oooh...look at that beautiful yellow!   Oooh....oh, I like the smell of this pink one over here.   Ooooh...that red one is calling my name!" That's why they flit from here to there constantly not knowing where to land first and how long to stay there!!

Internet source
Well, that's the way I'm feeling these days.  Like a bumblebee in a flower garden.  Well, not with flowers but much more important things!  I spent a gosh awful amount of time cleaning and packing and purging over the last year, which ended up being really good exercise in disguise.  My energy level has picked up somewhat and the desire to move onto bigger and better things has kicked in.  So guess what??  My creative mojo is coming back!  Well, I've made things for the grandbabies but that doesn't really count.  I'm finally getting back in the mood to start sewing and being creative for myself.  It's been awhile.  But the problem is.....

where to start!  Well, actually, where to land and stay awhile.  :/  I've already started on a  few of these projects.  Yeah, did you catch that?  "Started on a few of these projects".  Like this one.  I love to crochet but hadn't done it in awhile until I came across these patterns earlier in the summer.  I bought alot of soft, pima cotton yarn (mostly from the UK) and I love how it feels.  The one on the far left is called African Flower...coasters and placemats maybe?  The one in the middle is a heart...wouldn't this make an adorable banner?  And then the medallions are from an 1893 pattern....more coasters!
 
I've been coveting some sling bag purses that Dawn from The Feathered Nest has made and decided to make one for myself.  There couldn't be a more beautiful combination....canvas muslin, ticking fabric, vintage laces and trims.  Well, I had so much fun making it that I decided to make some more to put in my Etsy store.  They're almost done!
 
And then there's this.  I am over the moon in love with this Pam Kitty Morning fabric!!  While watching TV in the evenings, I am working on some cute little things that are going in my Etsy store soon.  But more about those later. ;)
 
I love the colors of Fall and have some fabric pieces that I want to use.  Maybe a table runner?  I've got this book that I've been getting some ideas from but not quite sure yet on what to make.
 
With all the hand sewing I do from my comfy recliner, I wanted a small, portable storage box for thread, needles, scissors, etc.  So I need to cover this little gift box in some fabric and pretty trims.  Can't decide exactly how to finish it though but, once it's completed, I'll show you.  What should be at the top of my sewing "to-do" list are these projects....
 
I started this quilt project way back when my youngest daughter was about 18 years of age.  That was over...ahem...ten years ago!!  With moving out here several years back, health issues and such, well, I had forgotten aobut it.  Until I came across it in the top of my closet last winter.  Yeah, pathetic huh?  The squares are a bit tricky (for me anyway) to put together and I've been dragging my feet about getting it done but I promised her I would have it finished this winter.

And last, but not least by any means, is this felt stocking kit for Little Bubba.  I started a tradition of making each of my grandchildren a Christmas stocking, which stay at my house for little goodies that Santa brings for them.  Yeah, Santa still comes to my house.  Next year, I have to make one for Peaches.  She's too little right now to know any better so I've got some time to get one purchased and made for her.  I'm so glad that I started this as the children anticipate them being hung on the stair railing and love looking at the intricate details on their special stockings.
 
See?  I feel like a bee in a flower garden!  Sigh...I am so thankful that God blessed me with the ability and desire to be creative but sometimes it can be a curse.  LOL  So many things I want to make!!  I haven't even shown you what I made Monkey for her birthday and I've got one more thing to get finsihed and in the mail.  Busy, busy, busy!!
 
Until next time.....
 
Photobucket

p.s.  I told you that several of these projects will end up in my Etsy store so if there's anything you would be interested in purchasing, let me know.  I'll give you more details and put it at the top of my list! After all, Christmas is just around the corner.  Can you believe it?

Pin It

Wednesday, February 22, 2012

~A Little Bit of Glitz~

Hi there, remember me?  I've had a few ideas floating around in my mind about some posts I've been wanting to do and have been working my way through them but a day goes by, then three, and now here it is a week later and I haven't gotten a single one of them completely done or posted!!  Well, I'm taking care of that right now.   Aren't you glad?

A few weeks ago, I went in our local thrift store and found this little lamp.  I was needing wanting a spindle type lamp for my sewing area to provide better lighting and this one was only five bucks.  Other than being a bit dirty and fairly plain, it was in pretty good condition and it worked!

All I needed to do was apply a little paint and fancy up the lampshade some.  I had some leftover toile fabric from the shower curtain in the bathroom that I wanted to use, so all I needed was some trim.  I was at Hobby Lobby and spotted this pretty pale pink glass bead trim.  I'm not normally a fan of this type of trim but I'm wanting to add a few feminine touches to my sewing/craft room and this works well with the cream. sage green and light pink colors there.  And I also bought some dark sage green braided trim as a backup.  Plus, they both were on sale.  Woohoo!!

 I finally got to a place where I could set aside some time yesterday to transform this little beauty!  The lamp spindle was a flat white and I wanted to add a bit of color.  So, I pulled out my acrylic paints...Antique White and Snow White.  Once painted with that blend, I wanted to 'stain' it a bit with the antiquing medium in Apple Betty Brown but had to apply an acrylic sealer first.


Once that all dried, I applied another coat of sealer.  Kind of a "smudgy" type finish.  If I had to do it over again, I probably would have just stuck with the snow white not adding the antique white and going with something like a walnut color with the antiquing stuff.  It turned out to be a bit more brown than what I was wanting, but I like it.  I can always change it later, right?

 Now on to the lampshade!  I gave it a little bit of scrubbing to get the dust off.  It was kind of stained but I was going to cover it, so it didn't matter.  I didn't include the braid trim in this picture because I wasn't sure whether I was going to use it or not.  I wanted to use something that made the the entire fabric stick to the shade, so I pulled out the spray adhesive, which I had never used before.

 First, I had to make a pattern.  Grocery sacks make great pattern pieces and keep plenty of them on hand.  Laying the shade on its side, I used my trusty pen for drawing as I rolled the shade around in a semi-circle creating a pattern.

 I cut the fabric on the fold because the pattern went in one direction but ended up cutting it in two pieces anyway because it didn't turn out exactly like I thought it would.

Working my way around, I sprayed a bit then pressed and smoothed out the fabric a bit.  I really loved using the spray adhesive as it allowed me the freedom to reposition the fabric when necessary.  Can you see the ribbed edges of the frame?  Well, I didn't like the way it looked, so I decided to cover them with the braided trim as well as along the top and bottom, which I am really glad I bought.

 I decided to use hot glue for the braided trim slowly working my way with each piece, putting a little glue and then pressing down making sure I got it lined up right cuz once that sucker dries, it's done!

This project became an adhesive menagerie because I used double-sided adhesive tape for the glass beads.  The spray adhesive is a bit messy and, with the dangling beads and ribbon, I could see a catastrophe waiting to happen.  The hot glue wouldn't have allowed me to be able to reposition if I needed to.  So, it was on to the adhesive tape.  In fact, once I got it all on the first time, I didn't like the way it looked so I took it off and did it again.  It is a permanent tape but it takes a bit for it to set up.  By the way, use the scrapbooking kind or craft type, but not the Scotch brand type.  Something on a roll is easier to work with when you're working on a long piece like this.

Ignore the totes in the background.  Those are Christmas decorations that need to go in the attic (door on the left) but I need to put my shelving unit in there first.  Anyway....there you have it.  My little thrift store lamp with just a little bit of glitzy feminine touch.  What do you think?

Now I need to finish the next project/post I've got going on.  But I think I'll go get the massage I've got scheduled this afternoon first. :)

Hope you have a blessed day today, my friend~

            Photobucket

Pin It

TIP:  If the double-sided adhesive tape you are using is a bit too wide for your project, just fold the excess back so it's not exposed or in the way.  It's an easy fix without having to buy different widths of tape.

Partying at these blogs:

tinypic       Between Naps on the Porch     


Tuesday, October 25, 2011

~Quality Down Time~

Over the weekend, I had to spend most of my time lying horizontal.  Long story short, I think I developed a minor spinal fluid leak as a result of a nasty fall on my tailbone a couple of weeks ago and had to lay low in hopes of it healing.  It worked by the way.
I wanted to do some digital scrapbooking and all I needed was my computer.  No need to get up and down to get forgotten supplies or pictures.  Before starting though, I decided to do a little cleaning and organizing of the photos that I have on my computer.  I take lots of pictures and it really needs alot of organizing.  I am the world's worst at keeping things organized and I don't mean just my photos!! Always have been and probably always will.

Even though scrapbooking is my most favorite hobby, I have really gotten behind.  You can read about that post here.  I decided to start with 2009 for the digital scrapbooking only because that was the year my youngest grandchild was born.  I've already got my traditional scrapbooking going for 2003 (about two thirds done) but it's upstairs in my sewing/craft room.  There's no rhyme or reason as to why I do something.  That's probably why I'm unorganized.  Ahem...anyway.

 As a side note, I keep my photos and digital scrapbooking supplies in an external hard drive.  One:  because they take up alot of memory on your computer.  Two:  In case my computer crashes, I don't lose my photos.
Once I did a little of that, I was ready and opened the My Memories Suite program, bought several on-sale kits from a few of my favorite digital scrapbooking sites...KB and Friends; and Just So Scrappy Too (they don't know me from Adam or Eve for that matter) and even some FREE ones.  I love the type of graphics they offer and they are so inexpensive.  Well worth the investment.
It took me a bit to get my mojo going, but once I got started it was so easy.  Now only about 96,472 more photos to go...more or less.  I lost count.  No, I didn't really count but it might as well be that many.  So I tackle it a few pages at a time and hope I get them done before the Lord calls me home!

Have a beautiful Autumn day today ~

Thursday, June 30, 2011

~Fourth of July Craft Idea - Part Two~

Yesterday, I showed you how to make these festive centerpieces for the 4th of July holiday but I couldn't decide if I really liked using the bright red paper and fireburst decoration and so I thought I'd sleep on it.  Well, I couldn't wait that long.. .it was really eating at me that I could do better.  Of course, it may work for some but it wasn't the look I was wanting..so, I took off the fireburst display.  I'll save that for something else.  I took off the red wrappers that were supposed to be whipped topping since everybody knows there ain't no such thing as red whipped topping...unless you use loads and LOADS of red food coloring, but let's not go there.  Just agree with me, okay?


New cast of characters:
*White tissue paper cut into about 4- to 5-inch squares
*Several red and blue plastic straws
*Red candy for "cherries"

I thought maybe I could use just two squares of paper but decided that wasn't enough so I am using four squares of tissue paper.  Layer them kind of like I have shown above.


Cut two straws...I am using one red and one blue...and cut into about 5-inch lengths.  You can make yours longer if you want to.  Oh, I decided to change the straw colors.  The white ones just didn't have enough 'umph'.  That's the beauty of making these types of crafts.  There's nothing written in stone about how they should be done.  You can even use different colored straws if you want! Diversity is a good thing. Isn't that great???


Now take your two trimmed straws, overlap them slightly - they don't have to be exactly centered.  In fact, I like it better if they are just offset a bit.  Anyway....take a T-pin and secure the straws together.

I didn't take a picture of this step, but take your four or so layers of tissue...kinda scrunch them in the middle making a point (just like we did the red paper in yesterday's post).  Using a T-pin on the outside, secure it on the bald spot of your "sundae".  Then put your straws down in the middle of your new "whipped topping", which is white and looks more like whipped topping is supposed to look. :)  Push them in as far as they will go...you might want to use something a little more narrow than your thumb so that you don't flatten your design.


I didn't bother taking out my other decorations but I did reposition them just a bit.  I found some red Blow Pops that I could use for cherries even though they are a mite larger than what a cherry would be.  I unwrapped the candy just a bit so that I could cut off the stick, rewrapped it and secured the bottom of the wrapper with a T-pin.  I think red sour balls would look better though but I didn't have any and I wasn't going to go all the way into our small town...about a 20-minute drive to Wally World... just for a few red sour balls!
Tip:  Are your straws kinda lying down flat and not standing up like you want?  Take a T-pin and stick it in partway in under your straw for support.  Make sure you do it under the tissue paper so it doesn't show.  No one will know the better for it.


I changed out the white star for a red one.  I thought it showed up better.  Tada...and there you have it....two beautiful patriotic "sundaes" for your holiday setting!!!  So tell me, do you think the white tissue paper looks better or not?


I just bought the stacked American boxes at HL and found the other two in storage...quite by accident.  I forgot that I had them!  Guess I had better find me a better storage box for this stuff and LABEL it!  Ha!
I wanted to make a little vignette with my new patriotic "sundaes".


I could have put them on my beautiful table in the dining room, but we're not in there much.  So, I decided to put them on the island in the kitchen where we can enjoy them everyday.

Now back to the subject of diversity on this craft idea.  You could put some more of the candies in your sundae glasses if you wanted instead of the shredded paper.   Use whatever decorations you have...more or less...whatever floats your boat.  Put your own twist on the design just like I did when I "borrowed" this craft idea from Between Naps on the Porch.  By the way, if you haven't done it yet, you might want to meander over to her site to see how she made her beautiful "sundae".

This craft idea also works for other holidays and seasons...Easter, Halloween, a birthday, Christmas, a summer cookout...the ideas are endless!  And this would also make a great little gift for someone who is under the weather or returning home from the hospital...  Use your imagination and share your ideas with me, won't you?  I would love to post your pictures on my blog!  Enjoy.


LinkWithin

Related Posts Plugin for WordPress, Blogger...