Showing posts with label tutorial. Show all posts

Monday, December 10, 2012

~Twinkle, Twinkle, Little Star~

 In between trying to decorate the house for Christmas and trying to get a little shopping done (and I mean a little!), I've been making some new ornaments for our tree.  I came up with this muslin star that I absolutely love and thought I'd share a little tutorial with you.  In case, you wanted to make some yourself.

 Supplies I used:
fusible fleece...I love this stuff!
pre-washed muslin fabric.... give it a tea stain if you'd like.
scrap quilt batting or some type of polyfil ...this is to make your little stars plump.
rubber stamp ...this stamp is about 4 x 5" in size.
star template ...I found a paper mache one to use as a pattern, which is 4.5".  I'm not good at making perfect stars.
ink stamping pad ...the color I used is walnut.
dark red seam binding ...if the color isn't exactly the shade you want, give it a wash with watered down acrylic craft paint, scrunch and let dry overnight.
Twine....to create a hanging loop
Thread and needle...any ol' sewing thread (I used matching) and a small quilting needle works best for maneuvering.

1 ~ Using your template, cut two fabric and two fleece pieces for each star but cut the latter on the inside of your drawing line (about 1/8 to 1/4 inch).  **The fleece helps to keep the star smooth when you start adding filler.
2 ~ Center the fleece star on your fabric star and iron to adhere.
3 ~ Stamp your design onto the fabric.  I'm a novice when it comes to rubber stamping but I think I read somewhere that ironing the ink onto the fabric prevents it from bleeding.  **Cover your fabric with a piece of paper before ironing so that the ink doesn't transfer to the iron.  For those of you who have more experience in this area...am I right or no?
4 ~ If you want your stars to be a bit more rustic, run your finger or the edge of your scissors back and forth across the cut edge to fray the fabric.

1 ~ Cut a length of twine for looping and secure it on the inside of one tip of your star with several stitches making sure to pull the thread snugly.
2 ~ Put your second star piece on top and start sewing the two pieces together with a basting stitch around the edge.  Now this is the tricky part..  You are going to sew and stuff as you go...
3 ~  As you go around each point, stuff it with some filler.  I have lots of scrap pieces of quilt batting and have found that it works best for small pieces like this as it's not near as messy as polyfil.  **To make your stuffing process easier, cut batting into small pieces and use a small tool, such as a crochet hook or the point on a small pair of scissors, to stuff. 
4 ~ Work your way around the star, sewing and stuffing,.  Secure your basting with a couple of stitches in between the fabric layers to hide the knot.

Create a bow with your seam binding with as many loops as you would like. I used four. With thread and needle, run a stitch through the layers and then wrap around a couple of times to secure your bow and then stitch it to your star.
 
 I thought my little stars looked a a bit "blah" and decided to add some jingle bells.  I saw some at HL in colors of green, red and gold (not too shiny) that I loved.  They were so cute!!   But I couldn't find any small enough.  So what is one to do?  You find some regular ones in the size that works (about 1/2 inch) and paint them!  It really was a royal pain and they turned out okay, but if I find any that are the size I am wanting, these babies are going to be replaced.

Secure a jingle bell, or two, and you're done!  Now to hang them on the tree.


 I love how these turned out.  I think they fit in perfectly with all the other ornaments that are handmade or rustic in style.  I plan to make some more using green seam binding.  I hope you enjoyed my little tutorial.  If I didn't explain it well enough, don't hesitate to ask.

I've got a couple of more ornament ideas that I'm planning to share this week, so stay tuned!
.


Photobucket

Thursday, January 19, 2012

~How to Preserve Your Sewing Patterns Tutorial~

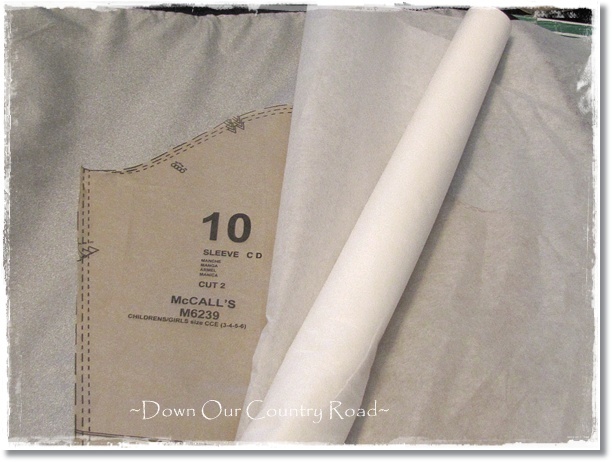
The other day I shared with you how excited I was to get alot of new sewing patterns cheap, cheap, cheap.  They are so expensive and being able to use them often is the key to getting your money's worth.  Plus, the pattern pieces are printed on a somewhat delicate tissue paper, which causes the paper to tear easily.  It then dawned on me that I have a couple of methods I use to preserve my patterns enabling me to use them many times without them being torn to shreds.

Before trying either one, make sure that you iron each patterns to get out all the wrinkles.  The first method, one that I found a couple of years ago on someone's blog, is to trace your patterns onto a more durable paper before cutting into them.  The blogger recommended using freezer paper but I found it to be a bit stiff and hard to work with.  So I did some research and found a product called Swedish Tracing Paper.  It's pliable, strong and easy to see through.  It is often used for putting together a "trial" outfit for fitting purposes.  I purchased a couple of rolls and found it to be an extremely good product.

Whether laying out several pieces at a time or one at a time, lay your paper on top and use some type of weights to hold the pieces in place.  Since this is paper, you can lay them any which way to keep from wasting any and I use pattern weights.  Trace all the pattern information on each piece.  This method is great for when you have several sizes on each piece like this one.  I find my self using this method when it is the only pattern I have because it is very time consuming.  I love to use this paper when creating or tracing designs for other craft projects.

The second method is the one I really like.  It uses lightweight fusible interfacing.  Since starting my Etsy store and sewing for my grandchildren, I need patterns in all the available sizes.  I'd rather spend a couple of extra dollars (when patterns are on sale!) and use this method.  A whole lot easier and faster and well worth the expense.  You'll see.

Cut a piece of interfacing just slightly larger than the pattern you are working with.  Lay the adhesive side up.  If you are not familiar with fusible interfacing, it's the side that feels just a bit rough.  Place your pattern on top.  You will also need an iron on a medium setting.   Start  ironing in the middle working your way outward.  This is very important:  Make sure your iron does not go past the pattern onto the interfacing or you will get the plate all gunked up!!

After ironing the center area, cut or tear strips of paper (I use scrap copy paper) cover the edges of exposed interfacing.  Finish ironing your pattern.  The strips of paper will pick up the adhesive but that's okay.  Once that piece is completed, just cut along the cutting lines and the strips of paper will drop away.  No gunked up iron!!

Voila!  You have  perfectly preserved pattern pieces with all the markings, which are also visible on the back side for those times you need to flip the pattern over.  Either method creates a thicker, sturdier pattern that can be used time and time again.  I wouldn't recommend using pins but rather some type of pattern weight.

Obviously, it would be very hard to fold the patterns and put them back in the original envelope.  I like to use either  a Ziploc bag with the pattern envelope showing on the front OR use a manila envelope and then label it.  Easy peasy.
Note:  If your pattern piece is smaller than the iron plate, place a larger sheet of paper on top of it before ironing and then cut on the cutting line.

I hope this little tutorial has been helpful to you.  Do you use a similar method or is this idea totally new to you?  I'd love to know.

I pray you have a great day ~


Pin It


Monday, August 1, 2011

~One Very Happy Little Monkey~


This is Monkey....my sweet little four-year-old granddaughter who lives far, far away from us.  Actually, she lives in Omaha, but it is still far enough away that allows us to see her only a few times a year.  I asked her mama to take pictures for me when she got the skirt she wanted me to make for her.  The other two were bonuses...just because.

This is the first skirt she pulls out...the teal bandana skirt that "she needed for summer".  She is always so appreciative of the gifts she gets and so the expression on her face tells me all I need to know.

And from this really big smile, I think she likes it!

Of course, the first and most important thing is to check out the twirl factor.

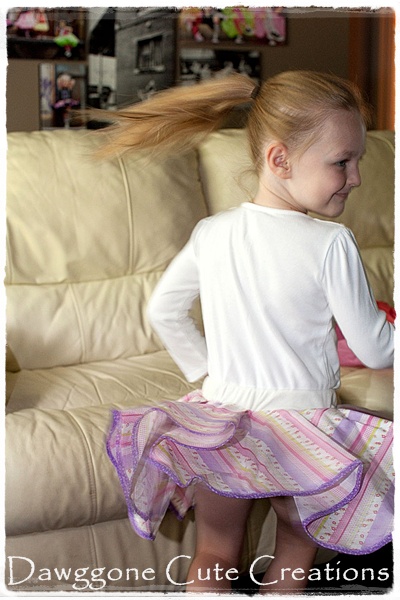
Next is the striped skirt where I made a circular type pattern instead of the points and added the purple trim.


I think she's really liking the twirl factor quality, don't you?

And the last skirt is the bandana type fabric with the added eyelet trim.  This is my favorite and I can see her wearing cowboy boots with this one!  I imagine that she was getting quite dizzy from all that twirling and probably figured that this one twirled just as well as the other two.

Mama said she put one on and wore it for the rest of the day!  I think she likes them, don't you?

Have a happy day!

Tuesday, July 26, 2011

~Tutorial - A Child's Bandana Skirt ~

Several weeks ago, my daughter-in-law sent me an email and a bandana skirt tutorial asking if I could make one for Monkey.   Well, this looked absolutely adorable and fairly easy and so I said, if she sent me the bandanas, I would make it.


Shortly afterwards, I get an envelope with two large bandanas and this letter.  Monkey is only 4 years old so her mama wrote the letter for her.  This is what it says:

Dear Mammer,
Here are the "bananadanas" I picked out for my new skirt.  I picked out the teal because "I need a teal skirt for summer."
"If you like my skirt we can buy more for you to make more skirts."
"Mammer, thank you for making my skirt."

Now, how can Mammer (that's me) resist such a sweet request?  Let's get to work!

First of all, the list of materials is very short:
*Two large bandanas (approximately 22 inches square)
*Elastic (I used 1-1/4" wide)
*Ribbing (the original tutorial called for t-shirt fabric but I opted for a pretty rib knit fabric) 

Note:  This tutorial is going to be rather lengthy as I am want to make sure that beginning seamstresses know what to do.

Working with one bandana at a time, fold it in half, then in half again creating a square.  Make sure that your folds and seams are even...very important!  We are going to cut off the point of the fabric to create an opening for the waist.  Lay your fabric on your cutting mat.  Line up the left and right points of your diamond shape so that they are on the same line.  As you can see here, I didn't. :/ I lined up my top and bottom points and didn't pay attention to the other points.  You'll see what happens in a minute!  Anyway....using a large ruler, measure down two and a half inches and cut off your point.  If you don't have a rotary cutter, pin your fabric together, measure, draw a cutting line and then cut with your scissors.


Open up your folded fabric and now you will see a hole in your bandana!!  Place your ruler on one point and line it up making sure you have a straight line (you can probably use the fold in your fabric as a guide).  Cut along the ruler line using your rotary cutter.

Now here's the tricky part....we are going to create "open" pleats and the question is...do you want the pleats to open on the inside or the outside of your skirt?
If you want your pleats to open on the outside, you will work on the right side of your bandana.

If you want the pleats to open on the inside, you will work on the wrong side of your fabric.

I chose to make my pleats on the outside of my skirt as I thought it would make it more flouncy.  Now, I hope I can explain this clearly.  To create a pleat, make a fold along one of your points.  Pull up the fabric and kinda swing it around so that the cut line across the top is even.

Your folded pleat should look like the above picture.  Depending on the waist measurement of your child, you may need to play with the depth of your pleats.  But we'll talk more about that in just a bit.  Pin your pleat in place.  You know your pleat is straight if the inside and outside edges of your pleat are even. Continue working across your fabric piece creating pleats in each point.  I'm right-handed and I like to work left to right.  It's okay to do it right to left if you prefer....as long as you do it the same way on both pieces!  


If you want the pleats to open on the outside, this is what it will look like on the right side of your fabric piece.

If you want the pleats to open on the inside, this is what it will look like on the right side of your fabric piece.


 Hi Banjo!  He's probably wondering what in the world I am doing.  I'm only 5' 2" tall and I'm standing on a little footstool to take better pictures on my cutting table!!


Sew your two sections, right sides together, with a narrow hem.  Don't forget to use your Fray Check since we're not making a hem.

This is what happens when you don't line your fabric up properly before cutting off the point!  If you have an uneven hem such as this, make sure that you have the hemmed edges matching.  When you create your pleat, this uneven area will be covered up and caught up in the hem of your ribbing.


Create your last two pleats and pin them in place.  Your skirt should look like this now.   You may or may not need to make some adjustments at this point.  Measure the waist area of the skirt.  I wanted my skirt to be about six inches wider than Monkey's actual waist size so that she could get it over her her little bottom.

 At first, I made my pleats about 3/4 inches deep but that made the skirt too large.  So I then made them about an inch deep and that was just enough to give me the six extra inches I needed.    Hopefully, you won't have to make too many adjustments to get what you need. :)  Once you are satisfied with how it is looking, sew a narrow basting stitch around the waist to secure your pleats.  You can now remove the pins at the waist.

This is my rib knit fabric and elastic for the waistband.  Remember, the waist of my skirt is about 28 inches and so I cut a piece 28" in length.  We are going to fold the ribbing over in half to encase the elastic.  We now need to measure how wide to cut your ribbing.  My elastic is 1-1/4 inches wide and my hem is going to be 1/2 inch.  That is 1-3/4 inches, double it and add just a bit extra for a bit more room, which makes an overall width of 4 inches.
 
This is a such a very simple method of encasing your elastic and attaching it to your skirt....I love it!   First of all, you need to get your elastic ready.  Cut your elastic an inch shorter than the width of your child's waist.  Overlap the ends by about one-half inch and sew all the way around that little rectangular area.  I like to use a zigzag stitch.  You are going to lay your elastic circle inside your ribbing circle on the top half.  Bring the other half up and pin the edges together.  Work your way around, pinning every couple of inches and sliding the ribbing over as necessary.  Okay, we're ready to attach to the skirt!

Pin your waistband to the right side of the skirt.  If you have to gather the waistband or skirt OR stretch the ribbing just a bit as you pin, that's okay because it's going to gather anyway.  Note:  Be careful not to catch your elastic as you sew!  I used a regular stitch first and then finished the edges on my serger so that it would have a clean look.

I ironed my pleats to give them a nice crisp pleat but it's not necessary.  Our skirt is done!  Isn't it adorable?  I had so much fun making it that I decided to make a couple more but used regular fabric instead of the bandanas.  I bought about 3/4 yard of each fabric I wanted and made two 22-inch squares out of each.

I fell in love with this pink and purple striped fabric.  I decided to round off the tips of the skirt to see how it would look.  I didn't want to have to hem it so I made my own binding using a purple floral print fabric.  Once it was all finished, I decided I didn't like it as well.  Next time, I may make a circle and do a poodle-like skirt.  That would be cute, too!

This one is a bandana type fabric and I had to add the eyelet for a more western look.  I was attaching the eyelet to the hem edge when my one of the threads broke and kept breaking (lower loop for you serger people out there) no matter what I tried to do.  I spent about four or five hours trying to fix this problem. and, oh my gosh, if I was prone to #%&*#$@#, I would have been doing some &#^@%@%#*!# but since I'm not one to !%^*@@*&!%#... I didn't!  I finally gave up and finished the edge with my regular machine.  It still turned out to be my favorite!!

So, here are my finished skirts!  What do you think? They went in the mail yesterday.   I hope she likes them.   If you decide that this is more work than you want to do, let me know.  I may add these cute little skirts to my line of products.  I'm thinking about calling them "Fandango" skirts.  The name popped just popped in my head!

Hope you're having a nice, cool day ~

LinkWithin

Related Posts Plugin for WordPress, Blogger...