Tuesday, December 24, 2013

~Merry Christmas!~


As we celebrate the birth of our Lord, may we share with others the love He came to bring.


Wishing you a warm, blessed and very Merry Christmas!  I pray that God's richest blessings are bestowed upon you and your loved ones during this beloved holiday!


With love and hugs~
Photobucket
Pin It


Wednesday, October 16, 2013

~A Fall Apple-Themed Tablescape Party Idea~

Last weekend, we were in Omaha visiting my son, daughter-in-law and granddaughter, Monkey.  On Sunday, Jane (d-i-l) wanted to take us to an apple orchard for some good ol' apple pickin' before we started the trip home.

About an hour south of Omaha is a lovely town called Nebraska City where the Kimmel Orchard is located. The farm was started in the 1850s but the orchard and vineyard was established in 1925 and, over the years, has developed into a huge and impressive place.

There are acres and acres of vegetables and fruits...

enormous vineyards used to produce a variety of wines...

and fun things for the kids to do (there is also a huge pumpkin patch but I failed to take a picture of it).
 
But, since we were limited on time, we came to do this...pick apples!!  You're probably wondering...what in the world does an orchard have to do with a fall tablescape??  Well, hold your ponies.  While going up and down the many rows of apple trees, we came across this....

The most adorable apple-themed tablescape for, of all people, 2nd-graders!!  There was a woman standing nearby who had set it up and was waiting for her guests to arrive.  I didn't want to be rude by drooling and aahing over what she had created so I just snapped a few pictures.

Carafes full of apple juice waiting to refill the canning jars that were topped with lids and straws, caramel apples and caramel corn served in painted berry baskets....

 and sitting atop wooden crates were plates and plates of apple donuts.  Talk about sugar overload but who cares when you're being served these wonderful delights!!  All of these sweet treats were being sold in the apple barn, by the way, and I'm sure this is where she got all of her edibles.
 
The centerpiece was a lovely fall floral bouquet and there were smaller bouquets placed here and there down the long tables.  You can also see apples being displayed in small wooden baskets and gallon jars.

No fall party would be complete without apples for dunking!  Very thoughtful idea to hang towels on the handles of the galvanized tub for drying those dripping wet faces.

The 'entrance' to their little party was a banner made of colorful hankies.

At the other end was a pennant banner.  I didn't look closely to see how they were made nor the theme of that banner.  Now the children might not appreciate how adorable the theme and setup is for this party but I think this is a very creative idea for an adult party, fall tea or luncheon.  This is right up my decorating style and something simple to create.  Don't you agree?
 
I would have loved to stay longer but we had to hit the road for the long 7-hour drive home.  Between the three of us, we were able to gather about two bushels of apples.  We had to sample a few while picking and they were so, SO good!  Thankfully, Monkey wanted to bring her wagon along!  Yes, the sun was bright but it was a most beautiful day for gathering apples. 
 
Until next time ~

Photobucket
Pin It

p.s.  I betcha you're wondering what I'm going to do with my bounty, huh?  First of all, I'm going to make some crockpot apple butter and then I'll probably do some canning for future apple pies and cobblers.  I also came across a recipe for apple-ring pancakes that I can't wait to try.  If they taste as good as they look, I'll share the recipe with you. ;)

You'll find me partying here...
Stone Gable's Tutorials, Tips and Tidbits

Wednesday, October 9, 2013

~Beautiful Fall Colors Found in Fabrics~

If I could decorate my house in Fall colors and with Fall decorations all year long, I would.  I've always been drawn to the warm and earthy colors of brick reds, rusts, eggplant purples, goldish yellows, bark-colored browns, burnt oranges ...you get the idea.  No bright, primary colors for me...no sirree.

Internet source
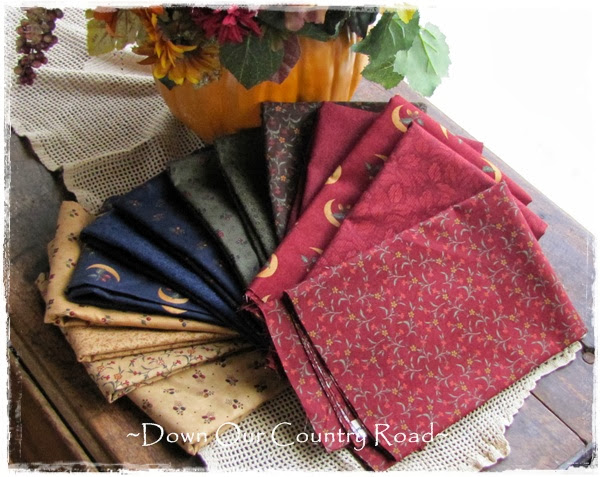
Several months ago, I purchased a pack of 5" square fabrics from Moda called Harvest Moon.  I was in love!  I knew that I could AND would do something with it sometime in the Fall.  Now that Fall is here, the creative light bulb finally came on and I have several things in mind that I want to make. But this little pack of fabric just wasn't going to go very far so it was time to start the hunt.  Then I hit the mother lode!! Oh my....the collection I had was designed by Kansas Troubles Quilters and, come to find out, they had designed more lovely fabrics that coordinated beautifully with what I had and was looking for.
 
 This is, by no means, the entire selection of Kansas Troubles fabrics, but I've got a pretty good start on my collection.

You may be thinking I've lost my mind when I say that this makes my heart go pitter-patter.  You're thinking that, right? 
 
Beautiful tans with touches of green, red, brown, blue....
 
Deep emerald greens and bark-colored browns....
 
Dark brick-colored reds....
 
Rich blues....
 
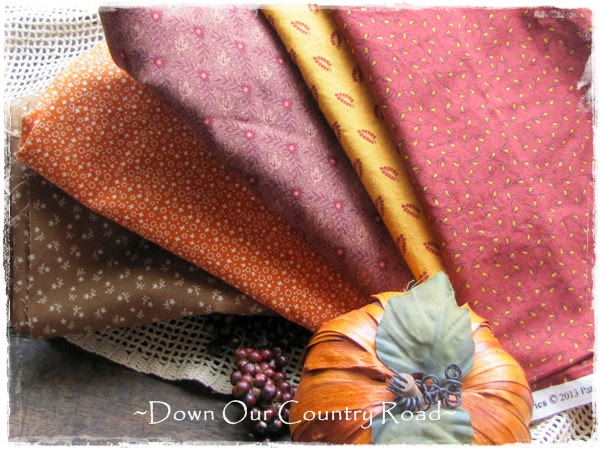
and some other fabrics that I already had on hand....in various shades of browns, golds, oranges and rust..
 
All shades that coincide with the rich, deep, warm, earthy and comfortable colors of Fall!!  I'm not finished collecting but I think this is a good start, don't you?  And, with the projects I have in mind, it won't take long to use them up. :/
 
I'm so smitten with these fabrics that I've been thinking....the home I currently live in is already decorated with some warm, earthy type colors but on a lighter scale.  I'm drawn to the idea of decorating our new home (all year 'round) with the same color scheme found in these fabrics.  I think that with the right balance of neutrals, I can pull it off.  What do you think?
 
I'm getting way ahead of myself here!  I've got to get back to work on the projects that are on my sewing table...a few tablerunners, wall hangings and pot holders that I've got to get done and in my Etsy store before the Fall season totally gets away from me.  It's never too late to start or to continue decorating for Fall, is it?  I hope to be sharing those with you by the end of next week.
 
Until next time.......

Photobucket

Pin It

p.s.  By the way, Moda Fabrics and Kansas Troubles Quilters do not know me from Adam.  I am not being compensated in any way for sharing this fabric collection with you.
 

Thursday, October 3, 2013

~A Little Orange and Black~

Orange and black.  You're suspecting that this has something to do with Halloween or Fall, right?  Well, I'm sorry to disappoint you.  It has nothing to do with either but rather something much more important and fun...school colors and school pride!

This is my granddaughter, Monkey, with her Mama and other grandma, JuJu.  They live in Nebraska and are big Cornhusker fans...I mean really BIG!!  Monkey got to celebrate her 7th birthday by going to her first college football game.  But they are also Oklahoma State Cowboy fans because her daddy and his side of the family (that's us!) are diehard, bleed orange and black Cowboy fans.  And, to top it off, her Poppa (Mr. Bill) played some college football there!  Anyway, her Mama asked me to make her something orange and black (school colors) so that she could show off her Cowboy pride.

She showed me an outfit from a retail place and asked if I could make something like it.  Do you know there are no peasant type dress patterns for little girls?  Seriously.  I thought they were "in" this year.  Anyway, I had to combine two patterns to come up with this dress.

A nice wide, black and white polka dot sash really stands out against the orange chevron print.

I finsished the edges of the sash and ruffle trim with my serger.  I think the two rows of ruffles are so cute.  Adds a bit of flounce, don't you think?

Jane, Monkey's mama, also asked if I would make a hairbow.  This is my first attempt.  I've never made big girl hairbows before.  Can you believe it?  I've got three granddaughters!!  Anyway, I layered together two pieces of the chevron fabric with interfacing to give it some stiffness, cut into several strips and trimmed the edges with my pinking shears.

A covered button made with OSU logo fabric finishes it off.  It was fun to make but I have to admit that it was rather hard on my hands.  I suffer from arthritis in my thumb joints :/   Bummer!

It's done and they went in the mail yesterday.  I just hope it fits!  Though I used the recommended measurement on the pattern, I have a feeling the neck opening may be a bit too large.  Thankfully, we are going up there for a visit in about ten days so I can make some adjustments, if necessary, when I'm up there.  Can't wait to see her display her Cowboy pride!    I had so much fun making this outfit and hairbow that I've got one in the makes for Tater Tot, the 5-year-old granddaughter.


Internet source
 
GO POKES!!
 
p.s.  Referring to the arthritic pain in my thumbs....I wear Handeze arthritic gloves (if I remember to put them on!) when sewing, use BioFreeze around the joints and have my hands worked on by the chiropractor and massage therapist when necessary but the ol' thumbs still give me issues.  If you suffer from this affliction, what do you do to help overcome the problem?
 
 
Until next time.....

Photobucket
Pin It

Monday, September 23, 2013

~Crafting Lap Tray Makeover~

I do alot of hand work...sewing, crocheting, etc, while sitting in my comfy recliner as I watch TV.  Multitasking, you know ;)  But I don't know how many times that I have dropped my scissors, thread, crochet needle and such and then they slip down the side of the cushion and down into the bottom of the recliner!!  Which means I have to get up, turn the recliner over and try to dig out my lost items.  Not fun.

I thought a lap tray would work but everything would still roll or slip off the tray.  I came across some crafting trays at the fabric store but the designs they had in stock just didn't appeal to me.  Everything was for either children or teeny boppers. Bummer.  Finally, it dawned on me.  Get one and give it a makeover!!

I found this one at HL.  Truth be told, there is absolutely nothing about the design that I find appealing.  It's just not my style.  The only good thing it had going were the cup and pencil holders.  Perfect for holding those little items that slip out of my hands and fall down into the cushions!

But I had to do something about these colors...

And definitely this backing!  A velour type fabric means only one thing...it will attract threads and bits of fabric like nobody's business.  Not good.  There is a carrying handle and a zippered opening for replacing or adding more of those little styrofoam beads if one was so inclined but those aren't on my 'must-have' list.

First thing to do was repaint the cup and pen holders.  I used my craft paint but it wasn't sticking very well and scratched off very easily.  So I scraped it off and mixed the paint with some Mod Podge glue.  That seemed to do the trick.

I dug through my stash of scrapbook paper and found some that looked rather feminine.  Using the Mod Podge glue again, I adhered it to the top of the tray but it created too many bubbles so off it came.  Next attempt was with spray adhesive.  Much better.  The hard part was piecing the paper sheets together and cutting around the holders. I let it dry overnight and used an exacto knife for trimming but still did a rather sloppy job of it.  What does any smart crafter do?  You cover it up!!  Before applying the mini pompom trim, I sealed the scrapbook paper with a layer of Mod Podge as I was afraid the paper would tear easily.  I started freaking out when it started bubbling again but was able to work them out once it started drying.  Whew!
 
For the back, I purchased this quilted fabric in an ivory color.  I turned the tray upside down, laid the fabric over it and just did some freehand cutting.  I saw no need to take off the black velour.  Using my hot glue gun, I worked my way around the tray adhering the fabric along the edges leaving the rounded corners for last.  Then I just scrunched up a little bit at a time and glued some more.  It wasn't too tricky and didn't have to be perfect because of the soft bottom.
 
I used some more of the pompom trim to cover up the raw edges of the fabric.  I started at the bottom middle (area closest to me) and just overlapped it a bit so that it didn't show too much.  All of the trim was applied using the hot glue gun.
 
Don't look too closely at the sloppy job I did with the glue gun. :/ 

So there you have it!  My not so appealing crafting lap tray is now something pretty to use while I'm working.  Much better, don't you think?
 
Now it's time to get to work on some projects...maybe this one?
 
 
Until next time ~

Photobucket

LinkWithin

Related Posts Plugin for WordPress, Blogger...